Showing posts with label dessert. Show all posts

October 19, 2013

Pumpkin Roll

 Fall has arrived. I know this because there are leaves on the ground and I watch children walk to school all bundled up in coats and hats. I know it's Fall because the stores are full of pumpkins and gourds and Halloween costumes and cinnamon scented candles. 

November 30, 2012

Pumpkin Scones with Spiced Glaze (like Starbucks)

 Pumpkin. This time of the year, especially, we just can't seem to get enough of it. Cinnamon, cloves, nutmeg, and ginger spice these scones up deliciously. Then, to put them over the top, a plain sugar glaze drizzled with a spiced sugar glaze.

May 12, 2012

Coffee Flan with Cajeta

I chose Rick Bayless's Flan de Cafe with Cajeta for this week's I Heart Cooking Clubs.

Can you say time consuming? This was. I used whole milk in place of goat's milk for the cajeta and stood for a little over an hour at the stove, stirring. The cajeta is delicious. The recipe asks you to strain the cajeta after cooking and I just don't see how that would be possible. Maybe I made mine too thick? I don't think so, but there's no way I could have gotten that flan through a strainer!

April 13, 2012

Grilled Cornmeal Pound Cake

Rick Bayless @IHCC button rounded

When I worked in an office, once a month we'd get a bakery-made cake and celebrate everyone who had birthdays that month. You know the cakes... the ones with tons of too-sweet frosting and big gloppy roses on the corners. There was always somebody who wanted the corners so they could have more frosting. Then there were the people who wanted a middle piece without too much frosting, and even then, they'd end up scraping it off. 

January 21, 2012

Ooey Gooey Butter Layer Cake - Paula Deen


My sister made this recipe around Christmastime and she said it was delicious and everyone who ate it raved about it. I invited friends over for dinner and cake for one of their birthdays and asked what kind of cake he wanted. He requested anything but chocolate, so I decided to make this.

July 29, 2011

Raspberry Buckle

This is week 7 for our garden this year. We got a late start because of too much rain. I don't think the garden is as lush as last year at this time, but it's doing okay. The herbs I put in pots are along the edge of the garden and they are thriving. We've harvested spinach and radishes and one or two small tomatoes so far. There are bell peppers, yellow peppers and jalapeno's on the plants and lots of tomatoes and of course, zucchini with several blossoms already. The new deck is coming along and the railing will be up shortly.
When I was a kid, we'd pick blueberries just down the road from where we lived. My dad punched two holes in big tin cans and strung a rope through it so we could hang the can around our neck. . 
I wish I had that setup yesterday when a friend let me pick these raspberries. I could only pick one-handed, but even that didn't stop me though from filling my bucket with these crimson beauties!
I came home and made Raspberry Buckle. How is a Buckle different from a Slump, a Grunt, a Cobbler, a Crumble, or a Betty? You can get the scoop right here.

The recipe I used is from Martha and it was very good. I didn't have any vanilla ice cream in the house, but I think a scoop along side a warm scoop of this would be great!

April 19, 2011

Best Cheesecake Ever!

Whenever I need a cheesecake, I rely on this one that I found  in 2001. It's rich, cheesy and creamy... perfect if you want a plain cheesecake that can be topped with fruit.  

Apparently, this recipe was served at the Old Original Bookbinder's Restaurant in Philadelphia, which was the oldest seafood restaurant in the city. The restaurant began as an oyster saloon in 1865 by Dutch immigrant, Samuel Bookbinder. The restaurant filed Chapter 11 in 2006 and has since closed, but another restaurant continues operation today in Richmond, VA.

I adapted this recipe slightly in the amount of graham cracker crumbs I use. The original recipe calls for 2 tablespoons to be sprinkled over the bottom of a 9-inch springform pan. That amount doesn't begin to cover the bottom of the pan, so I use the crumbs of five whole graham crackers.  

If you've never made a cheesecake, don't be intimidated. I think it's easier to make than a cake. Try this recipe and your family and friends will think you're amazing!


Best Cheesecake Ever! 
5 whole graham crackers (processed to make crumbs)
4 (8 oz) packages cream cheese, softened
1 cup white sugar
4 eggs
1 tsp fresh lemon juice
1/2 tsp vanilla extract
1/4 tsp lemon zest

Sprinkle the bottom of a lightly greased 9-inch springform pan with the graham cracker crumbs. Combine the cream cheese and sugar. Mix at medium speed until well blended. Add eggs, one at a time, mixing well after each addition. Blend in the lemon juice, vanilla extract, and lemon rind. Pour batter into the pan and bake in a preheated 325F oven for 50 minutes or until cake is set in the center. Loosen cake from rim of pan; cool before removing rim of pan. Chill before serving. Top with fruit of your choice.


January 15, 2011

Portuguese Rice Pudding

My grandmother never used a recipe when she made her rice pudding and I guess that my mom never made it because when we moved across country from my grandparents, we all longed for her rice pudding. My sisters and I tried lots of different recipes, but none were like we remembered eating from our Vo-Vo's kitchen.
That is, until I saw this recipe in California Farmer magazine, dated September 2, 1989. I copied the page and made some. We all agreed that this tasted just like we remembered and it's been a family favorite all these years.

Making this dish is similar to making risotto. First, 1 cup each of rice and water are brought to a boil. When the water has been absorbed, milk is added and the mixture is stirred until the milk has been absorbed by the rice. This is repeated two more times, then an egg and sugar are added. It takes a while to make, but the result is the creamiest rice pudding ever. 

If you've been looking for a rice pudding recipe and just haven't found the one that's perfect for you, I hope you'll give this a try!


PORTUGUESE RICE PUDDING
1 cup uncooked rice
1 cup water
5-1/2 cups milk
1 large egg, beaten
1 cup sugar
Cinnamon

Put rice and water in large saucepan and boil until water is absorbed. Add 2 cups milk and bring to a boil. After mixture comes to a boil, stir constantly to prevent burning until all milk has been absorbed. Add another 2 cups milk and bring to a boil, then stir constantly until all milk has been absorbed. Add 1-1/2 cups milk and bring to a boil, then stir constantly until all milk has been absorbed. Beat egg in a small bowl. Add a few spoonfuls of the hot rice mixture and stir. Add egg to the saucepan and stir until well blended. Add sugar, stir and cook an additional 2 minutes. Pour into individual bowls or into a 1-quart serving bowl; sprinkle with cinnamon and nutmeg and let cool. 

June 4, 2010

Rhubarb Pie - Just like Mom's

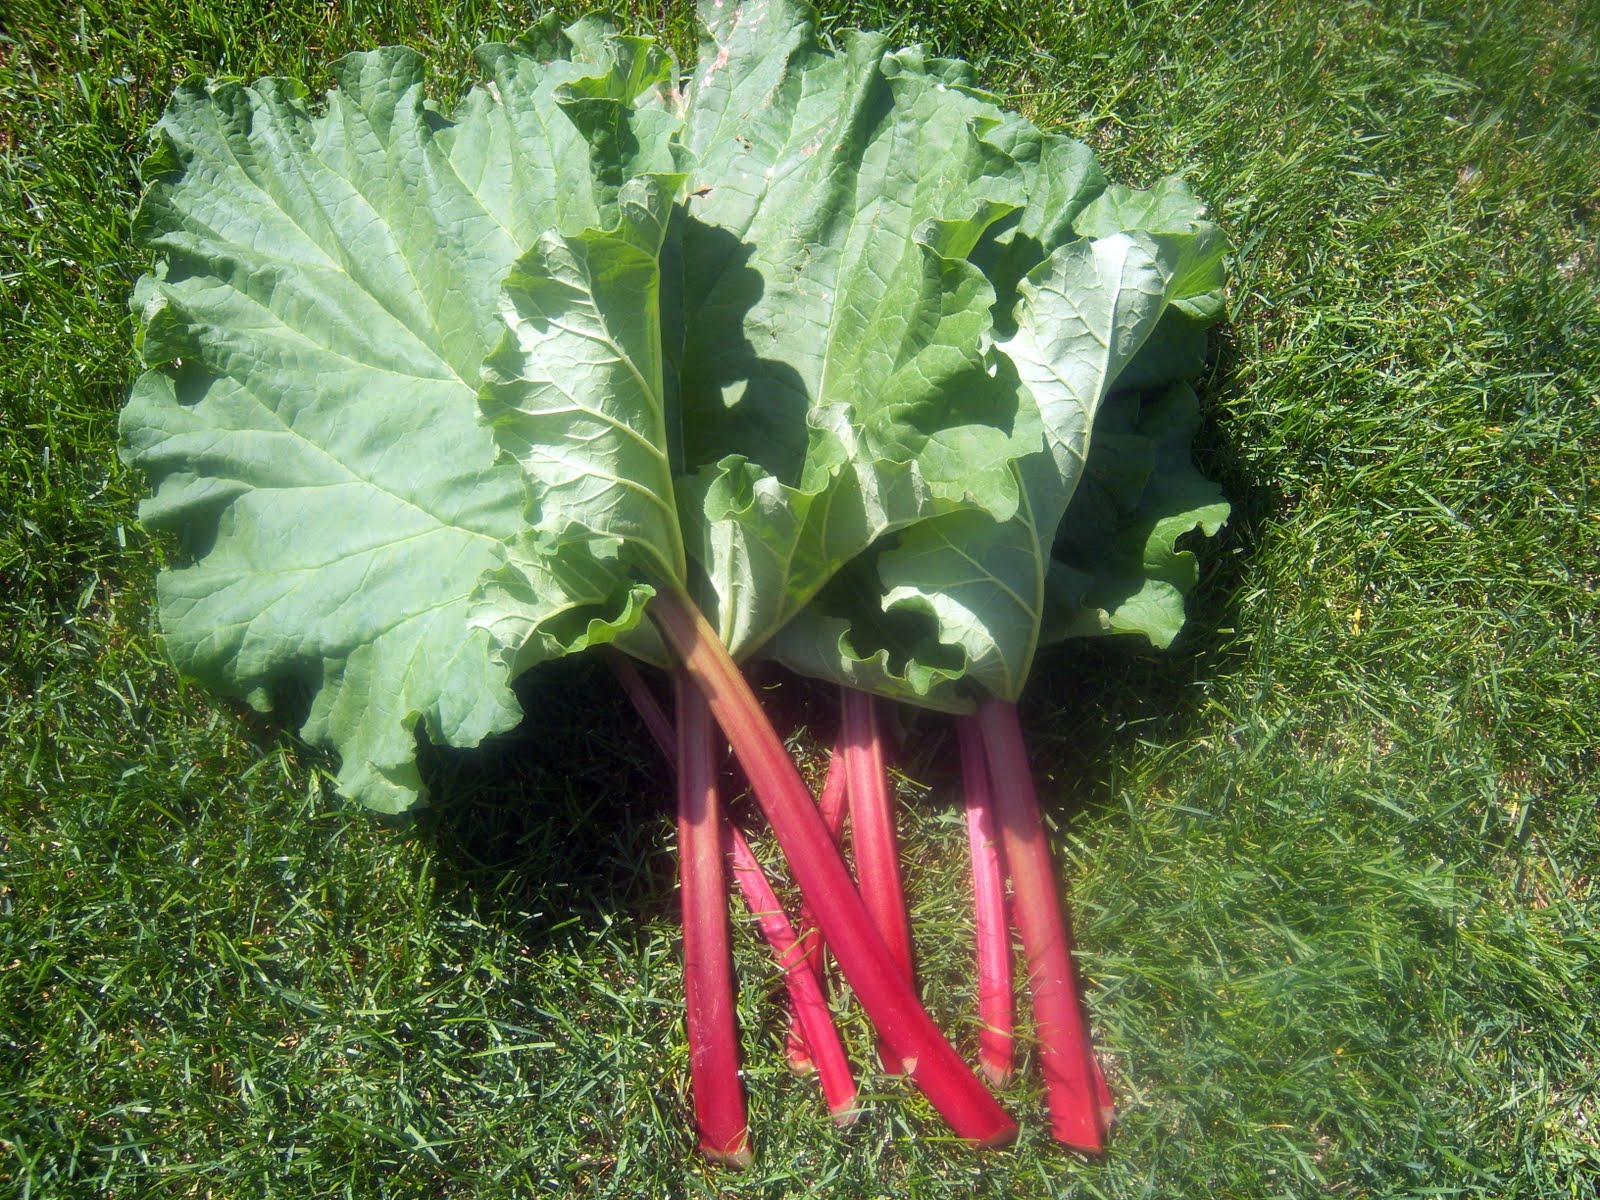
When I made my garden rounds this morning, I was happy to see that the spinach, lettuce, onions, and radishes are coming up. The tomato, zucchini, jalapeño and bell pepper plants are looking good, too. There are some big buds on the peony plants and the irises are still in bloom. When I got to the rhubarb plant, I immediately turned back to go inside for my camera and a knife! 
I googled some rhubarb pie recipes and they were just too involved. I saw recipes that called for cinnamon, lemon zest, strawberries, or orange peel. I wanted just a plain old rhubarb pie like my Mom used to make.
So, I went to one of the cookbooks that she used. 

How much more basic can you get than this recipe? Rhubarb, sugar, flour, and butter. That's it. I'm sure this was the recipe she used. I used 4 cups of rhubarb without increasing the amount of the other ingredients and the pie was just the right balance between tart and sweet.
I went with the pastry from this book, too. I had to laugh when I read this in the directions: "The family that serves pie often will do well to keep pastry on hand." Sounds like the woman of the house wasn't easily forgiven if she happened to run out of pastry! I used lard for the fat called for in this recipe (oh, yeah). I'm glad I did... this was the flakiest pastry I've ever made.
Oh, and don't forget to make sugar and cinnamon pinwheels with the leftover dough. They'll only take about 10 minutes in the oven and are a real treat!

February 9, 2010

Honey & Orange Cupcakes and a Valentine Giveaway!


Honey & Orange Cupcakes (Adapted from I Can’t Believe It’s Not Butter! ® Website)

2/3 cup freshly squeezed orange juice
½ cup honey
½ cup I Can’t Believe It’s Not Butter! ® Original spread
2 large eggs, separated
1 tsp finely grated orange peel
1-2/3 cups all purpose flour
½ cup granulated sugar
½ tsp baking powder
½ tsp baking soda 

Preheat oven to 350.  Line 12-cup muffin pan with cupcake liners; set aside.

Blend orange juice, honey, I Can’t Believe It’s Not Butter! ® Original spread, egg yolks and orange peel in medium bowl; set aside.  Combine flour, sugar, baking powder and baking soda in large bowl; set aisde.  Beat egg whites in small bowl until soft peaks form.  Stir orange juice mixture into flour mixture just until blended.  Gently fold in egg whites.  Even spoon batter into prepared pan.  Bake 18-20 minutes until toothpick inserted in centers comes out clean.  Cool 10 minutes or wire rac; remove from pans and cool completely.

These cupcakes are light, airy and delicious!  The would make a nice treat for your special Valentine!  I love the flavors or orange and chocolate together, so I made a chocolate ganache and dipped the tops.  Yum!

I was contacted by a representative from I Can’t Believe It’s Not Butter! ® and was asked if I would like to host a Valentine's Day giveaway with them.  Of course I would!  They sent me a gift set that included a beautiful serving tray, some tasty and heart-healthy recipes to try, and a gift card to purchase ingredients to make a recipe to post on my blog.

If you would like to receive a gift set from I Can’t Believe It’s Not Butter! ®, all you have to do is leave a comment on this post.  I'll choose a random winner and after I receive your mailing information, you'll get your very own gift set delivered to your door!

This giveaway is for U.S. residents, only.  You must either be a Follower of my blog or have a food blog yourself to enter.  The winner will be announced on Friday, February 12, 2010.  This giveaway is being run independently and I did not receive compensation for it.

You can find more information on I Can’t Believe It’s Not Butter! ® products at their website and you can follow them on Twitter!


January 26, 2010

Sausage and Spinach Stuffed Wonton with Brown Butter

I picked up some Wonton wrappers at the store the other day... thought it might be fun to make a few different fillings and give them a try! 
I removed the casing from one link of Italian sausage and browned it with some black pepper and granulated garlic.  I added about one-half package of chopped, frozen spinach, which I'd cooked, drained and cooled.  

After the filling had completely cooled, I put about a teaspoon of the mixture into the middle of a Wonton wrapper, topped it with a little grated Parmesan, wet the edges and folded it up, pressing the edges together so they would adhere.
I browned two tablespoons of butter in a frying pan and quickly fried the Wontons until they were golden and crispy.  Browning butter is easy... put a few tablespoons into a pan over medium heat.  The butter will foam up then settle down and start to turn color.  Watch it carefully so it doesn't burn... it can happen fast!

I just can't tell you how good these were!  I wish you would try them!  I think these would make a great party appetizer - alone or with a dipping sauce.


I had so many Wonton wrappers left in the package, I decided to experiment.  Although you can't really tell from this picture, I filled some with mini-chocolate chips & walnuts; one with prepared mincemeat; and one with peanut butter & mini-chocolate chips.  I fried them using cooking spray and sprinkled a little powdered sugar on top.  They were good!

And finally, I fried (using only non-stick cooking spray) a couple of wrappers flat then dusted them with powdered sugar and drizzled a little chocolate syrup over them.  A nice little treat!

December 18, 2009

Steamed Christmas Pudding

What do cilantro, anchovies, fruitcake and liver & onions have in common?

It seems that people either hate 'em or love 'em.  Me, I love them all.  Where do you stand?

If you don't like fruitcake, you're probably not going to like Christmas Pudding.  It's similar in that it has dried fruit, but this Christmas Pudding is different in that you get to add whatever you like!  If you don't like those little neon red and green candied cherries, don't use them.  If you love dark raisins but hate golden raisins, use all dark raisins!  If you've really got a thing for apricots, or prunes or cranberries... make your Christmas Pudding with those alone!

Can't go wrong with this recipe... let's have some fun!
I will pretty much eat anything ... not  a picky eater!  I started with one-half cup each of golden raisins, currants, dried prunes, dried apricots and dried cranberries.  Look at all those shriveled little bits of fruit.
Oh, I didn't tell you... I drowned them in brandy and let them soak overnight.  Look at those glistening, plump pieces of goodness!
Here's the pudding mold (mine has a 1-1/2 quart capacity).  Since this pudding is steamed, the mold should sit up off the bottom of the pot.  I placed a small trivet inside the pot, then placed the pudding mold in the pot while I ran water about half-way up the mold.  I put the water on to boil while I made the pudding.

Basically, the recipe calls for creamed butter and brown sugar; the addition of eggs, prepared mincemeat, pumpkin puree, orange juice and the brandied fruit (plus the brandy it was soaking in).  A little flour is added along with some baking powder, pumpkin pie spice and walnuts.
This the pudding after it was mixed up and placed into the mold (which had been sprayed with non-stick spray).  It's a fragrant, gloppy mess of a batter with more fruit than flour.  I was so excited to get it into the steamer!

I put a piece of parchment and then foil over the mold  to ensure no water got into it, and then clamped the lid on.
This pudding steamed for three hours.  This is what it looked like when I removed the lid.
This is just chock full of fruit and so moist!  It smelled heavenly!
I think this pudding is best warm.  It can be warmed either by wrapping the pudding well in foil and putting it into a 350 degree oven for 30 minutes or so... or, individual slices can be warmed in the microwave.

This is wonderful with a spoonful of hard sauce (a delectable mix of butter, powdered sugar and vanilla), but for the sake of today's photography, I whipped up a bit of cream sweetened with a little brown sugar.

I made two of these this week.  One to make sure it would work, because I chose my own ingredients, and one to send to a dear friend who loves Christmas Pudding as much as I do!

Merry Christmas, George and family!  It wasn't until I'd taken this picture and decided it was the one I would use as the final picture, that I realized that George had given me this Hummel "Ride Into Christmas" as a gift one year!


December 16, 2009

Lemon Cake Top Pudding

I thought this was a cute sign and it happened to be apropos to my post today, so I thought I'd include it!

I saw this Lemon Cake Top Pudding on Jady's beautiful and yummy blog, Cucina Panzano.  Jady made this lemon pudding sound so delicious, I just had to make it!
If you love lemons (or, if life gives you lemons!), you'll love this light and simple dessert!

Lemon Cake Top Pudding
2 T flour
3/4 cup sugar
1 T butter
2 egg yolks, beaten
2 egg whites, stiffly beaten
1/4 cup lemon juice
1 cup milk

Cream flour, sugar and butter.  Add egg yolks, lemon juice, and milk.  Fold in egg whites.  Bake in 8" pudding dish or individual custard cups (not buttered).  Set in a pan of warm water and bake for 35 minutes in a 350 degree oven.

August 3, 2009

Cherry Pie

Before I get started on the cherry pie, some of you asked if huckleberries might be available in your area. I'm not always sure I can remember where everyone resides, but I found this on the interwebs and probably should have posted it with my recipe for Huckleberry Muffins.

Where can I find huckleberries? Huckleberries are native to the northwestern United States and Canada, growing from Wyoming west to Alaska, Washington, and Oregon. They also grow in Idaho and Montana. The require elevations of from 2,000 to 11,000 feet.

Are huckleberries grown on farms? Current research says it is almost impossible to domesticate the wild huckleberry species but efforts are being made.

So, there you have it... if you live in the Northwest, go look for some huckleberry bushes... but watch out for bears.

Since moving to Montana a little over a year ago, I've heard several people rave about Flathead Cherries. In researching them, I found that there really is no such thing as "Flathead" cherries, but the cherries grown in the region of the Flathead Lake in northwestern Montana are referred to as such.

These cherries were available at our Farmers Market last Saturday, so we bought a bag. We ate a few and they were delicious... too delicious not to make a cherry pie. I stemmed and pitted them (without the use of one of these).

I used Martha's Pate Brisee for the pie dough. Because the cherries were so sweet and perfect, I only added 3/4 cups sugar and 1/3 cup cornstarch to the halved cherries, put them in the pie shell and baked the pie at 425F for 15 minutes. I then lowered the temperature to 350F and baked for another hour. Don't be laughing at my pie crust... I'm no baker... I'm a cooker :)

What to do with leftover dough? Make cinnamon rolls like my Mom used to. I rolled it out, put cinnamon and sugar on it then sprinkled it with mini-chocolate chips. I rolled it up, cut it into rounds and baked it.

Whenever my Mom would make a pie we would look forward to the pinwheels almost more than the pie!

Now, you can laugh at this... my gardener often tells me that I'm "losing it". Well, I put these pinwheels in plastic bags and then thought "Hmm, I should put them on a plate and take a pretty picture." So, I got a plate out, put five of them on the plate and then my MIL said something to me. After I answered, I picked up the pinwheels from the plate, put them back in the plastic bags and discovered when I uploaded my pictures from the camera that I'd forgotten to take a picture of the pinwheels on the plate.

I'll send you money if you don't tell my gardener.

June 13, 2009

Fresh Mint Chocolate Chip Ice Cream

I scream... you scream... we all scream for ice cream! Yay!

I'd been searching for recipes to use some of the mint I have growing and decided that I'd start with ice cream!

First I made the ice cream base, then I located my 30-year-old ice cream maker... yes, it's electric, and it was one of the first ice cream makers out that you could use table salt and ice cubes. I probably haven't used it a half-dozen times in the last 30 years.

I put the custard in the can, added salt and ice cubes and one cup of water to the well, as directed. Immediately water started pouring out of the bottom of the well. After I took it apart, I discovered the ice cream maker had a three inch crack along the bottom. I didn't want to go buy another ice cream maker, so I called my gardener, who never throws anything out. "I could have fixed that!" he's said to me many, many times! Okay, I lived too long on my own... if something broke and I couldn't fix it, I'd get rid of it and buy a new one. I'm finally learning that when something breaks I should just hand it over to my gardener.

When I told him I just needed a temporary fix, given the number of times I make ice cream, he suggested the trusty hot glue gun! Yes! A line of hot glue along the crack and I was good to go!
Put some mint leaves in milk, bring to a simmer, cover and let sit for a while.
I wanted an appealing green color to the ice cream, so added a drop of green food coloring. After you've made your custard, the milk is strained and added to it.
Process according to your ice cream maker's instructions and freeze for at least four hours.

After the custard was frozen, I folded in some mini-chocolate chips. The ice cream is cool, creamy and delicious with just a hint of mint. Perfect for a summer's day treat!

LinkWithin

Related Posts Plugin for WordPress, Blogger...